CA
CATABLE OF CONTENTS
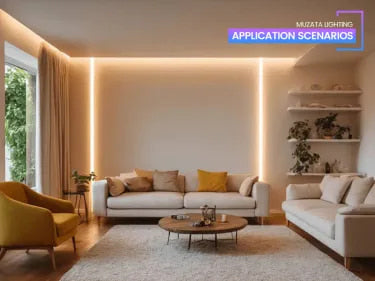
Can You Use LED Strip Lights for TV?
Do you want to upgrade your light setting for your house and don't know where to start? Try decorating your TV with LED strip lights, it won't disappoint you.

The Reason Why You Can Install LED lights for TV
Some might wonder: can I use LED strip lights for TV? Certainly, LED strip lights can provide a range of benefits for your TV viewing experience. They can enhance the contrast and color accuracy of your screen, making images appear more vivid and lifelike. This is particularly useful for watching films or playing video games where visual quality is crucial.
Feasible Operation
LED strip lights are generally easy to install and require minimal technical expertise. Most LED strips come with adhesive backing, making it simple to attach them to the back of your TV or other surfaces. Additionally, they often have flexible designs, allowing you to bend or cut the strip to fit your specific needs.
Cost-effective Investment

Muzata 16.4Ft COB LED Strip Lights
Yes, LED light strips are generally more affordable compared to other lighting options. While the exact price can vary depending on factors such as brand, length, and features, LED light strips are known for their cost-effectiveness.
It's important to note that while LED light strips may have a slightly higher upfront cost compared to conventional strip lighting, their energy efficiency and longevity make them a more cost-effective investment in the long run. The energy savings achieved through LED technology can offset the initial investment over time, resulting in lower electricity bills.
How Do You Install LED Strip Lights for TV?
After knowing its benefits, you can't wait to start decorating, right? If you are interested in installing LED lights for televisions, please read on and here is a expensive guide to help you out.
Tools and Materials You Should Prepare for Installation
-
LED light strip: Choose an LED light strip with the desired length and features suitable for your TV setup. Make sure it comes with adhesive backing or mounting brackets.
-
Power supply: LED light strips require a power source to operate. Ensure you have a compatible power supply that matches the voltage requirements of the LED strip.
-
Connectors and cables: Depending on the LED light strip, you may need connectors and cables to extend or connect different sections of the strip together. These can include connector clips, solderless connectors, or extension cables.
-
Scissors or wire cutters: You may need scissors or wire cutters to trim or adjust the length of the LED light strip during installation.
-
Cleaning materials: Before installation, it's important to clean the surface of the TV and LED light strip to ensure proper adhesion. Prepare some cleaning materials like rubbing alcohol or a mild cleaning solution, along with a soft cloth or sponge.
-
Mounting hardware: If you choose to use mounting brackets instead of adhesive backing, you'll need appropriate mounting hardware such as screws, brackets, or clips.
-
Optional: A ruler or measuring tape can be useful for measuring and ensuring accurate placement of the LED light strip.
Step-by-step Installation Guide

-
Prepare the TV and LED strip lights: Start by cleaning the back surface of your TV and the area where you plan to attach the LED strip lights. Use a tape measure to measure the desired installation location. Mark the location with a pencil or chalk. Next, measure the length of the LED strip lights. If the strip lights are too long for the target location, consult the product information to determine if they can be cut to the appropriate length.

-
Install the LED channel: Depending on the type of LED strip lights you have, either peel off the adhesive backing or use mounting brackets to secure the lights to the back of your TV. Ensure that the lights are evenly placed and avoid placing them directly on the screen to prevent any interference.

-
Cut the LED Light Strip
-
Cutting Method 1: Scissors: If the LED light strip is flexible and has designated cutting points, you can use a pair of sharp scissors to cut it. Align the scissors with the cutting point and make a clean, straight cut through the copper pads and circuitry of the strip.
-
Cutting Method 2: Craft Knife: If the LED light strip does not have designated cutting points or if you prefer more precise cuts, you can use a sharp craft knife or utility knife. Score the strip gently along the designated cutting line, making sure not to cut too deeply. Then, apply pressure at the score line to snap the strip apart cleanly.
-
Inspect the Cut: After cutting, inspect the cut ends of the LED light strip. Ensure that the copper pads are not damaged or frayed, as this may affect the electrical connections.
-
Seal the Cut Ends (optional): If the LED light strip has a protective coating or waterproofing material, it's recommended to reseal the cut ends using a suitable method suggested by the manufacturer. This helps maintain the strip's integrity and protect against moisture or damage.
-

- Tear off the adhesive backing and paste the strip: Once the strip is cut, carefully peel off the adhesive backing from the strip, exposing the sticky side. Align the LED strip with the desired location on the surface and gently press it down. Make sure the strip adheres evenly along its entire length.

- Install and LED channel cover and end caps: Place the cut LED channel cover onto the LED channel, ensuring that it aligns correctly. Some covers may have clips or adhesive backing for attachment. Follow the manufacturer's instructions to secure the cover in place. Slide the end caps onto the LED channel, one at each end. The end caps usually snap into place or have screws to secure them. Make sure they fit tightly to prevent the cover from slipping off.

-
Test the lighting settings: Most low voltage power supplies and LED lights use a positive (+) and negative (-) terminal or wire. Ensure that you correctly identify the positive and negative wires before proceeding.Connect the positive wire from the power supply to the positive terminal or wire of the LED lights. Similarly, connect the negative wire from the power supply to the negative terminal or wire of the LED lights. Use wire connectors, soldering, or other suitable methods recommended by the manufacturer to make secure connections.
-
Make adjustments if necessary: Take a step back and assess the lighting effect. If you need to make any adjustments, such as repositioning the lights or changing the brightness, do so until you achieve the desired result.
Tips for Getting the Best Results

Muzata V-Shaped LED Aluminum Channel System
To get the most out of your LED strip lights for TV, consider these tips:
Find the right LED strip lights by considering factors like brightness and color temperature that suit your preferences and room decor. Also, choose the appropriate length to ensure optimal coverage.
Proper placement and positioning of the LED strip lights are crucial. Avoid placing them directly on the screen to prevent glare, and ensure even distribution of light across the TV's surface.
Maintenance and Troubleshooting
To maintain the performance of your LED strip lights, regularly clean them using a soft cloth and mild cleaning solution. Protect them from dust and moisture to prolong their lifespan. If you encounter issues like flickering or dimming lights, check for loose connections or power interruptions and address them accordingly.
Set Your Own TV Backlighting
Remember to follow the specific instructions provided by the manufacturer of your LED strip lights, as installation methods and features may vary. Additionally, ensure that the power supply and all connections comply with safety standards to prevent any electrical hazards.