CA
CATABLE OF CONTENTS
How to Install LED Strip Lights: A Step-by-Step Guide
Are you looking to transform your living space with a modern, energy-efficient, and stylish lighting solution? LED strip lights are the perfect choice for anyone who wants to add a touch of elegance and functionality to their home. Whether you’re enhancing the ambiance of your living room, upgrading your gaming setup, or adding a unique touch to your furniture, LED strips offer unmatched versatility. But how to install LED strip lights like a pro? Don’t worry—we’ve got you covered with this comprehensive guide, complete with tips for beginners and seasoned DIYers alike.

How-to-Install-LED-Strip-Lights
Why Choose LED Strip Lights?
Now that you’re considering LED strip lights, let’s dive into why they are such a popular choice:
-
Energy Efficiency
LED lights consume significantly less power compared to traditional incandescent bulbs, helping you save on electricity bills. According to the U.S. Department of Energy, LED lighting can last 25 times longer and use 75% less energy than incandescent lighting.
-
Versatility
LED strips can be used in a wide range of applications, from home decor and automotive lighting to furniture accents, bars, and even advertising displays. Their flexibility allows you to create custom lighting designs that suit your specific needs.
-
Longevity
LED lights have a much longer lifespan compared to other types of lighting. On average, LED strips can last up to 50,000 hours, which means you won’t need to replace them frequently.
-
Ease of Installation
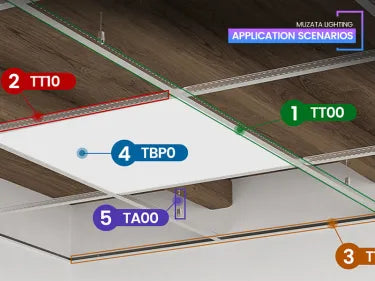
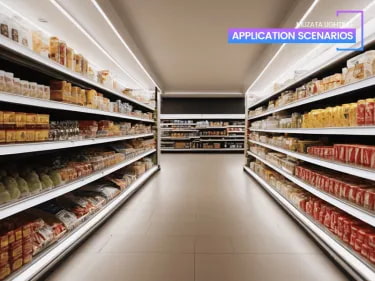
Common Applications of LED Strip Lights
LED strips are incredibly versatile and can be used in diverse ways, including:
-
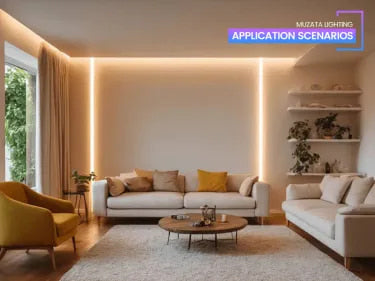
Home Décor: Accentuate ceilings, staircases, or under-cabinet spaces for a modern look.
-
Furniture Accents: Illuminate shelves, wardrobes, or headboards.
-
Automotive Lighting: Enhance car interiors or underbody for a sleek design.
-
Advertising Displays: Use for vibrant and attention-grabbing signs.
-
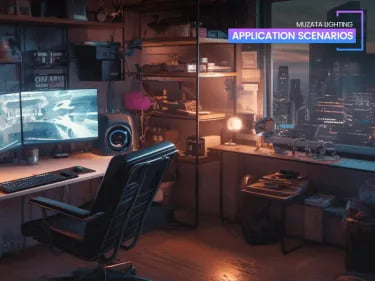
Entertainment Areas: Create an immersive ambiance in gaming rooms, bars, or home theaters.

Common Applications: LED light installation
|
Application |
Typical Length Required |
Recommended Color Temperature |
|
Kitchen Under-Cabinets |
2–5 meters |
3000K–4000K (Warm/Natural White) |
|
Gaming Rooms |
5–10 meters |
RGB or Neon Colors (Customizable) |
|
Staircase Lighting |
1–2 meters per stair |
4000K (Neutral White) |
|
Automotive Interiors |
2–3 meters per car |
6000K (Cool White) |
Do I Need an Electrician for the LED Strip Lights Installation?
With the benefits of LED strip lights clear, you might be wondering if you need to hire an electrician. The good news is, that most LED strip lights are designed for easy DIY installation. However, if you’re dealing with complex wiring, multiple connections, or need to adhere to local electrical codes, hiring a professional might be a good idea. For most residential applications, you can follow our step-by-step guide and handle the installation yourself. The National Electric Code (NEC) provides guidelines for safe electrical installations, so it’s always a good idea to familiarize yourself with these standards.
Step-by-Step LED Strip Lights Installation Guide
LED Lights Installation Step 1: Choose the Right LED Strip Lights
Before you start, measure the area where you want to install LED strips. This ensures you buy the correct length and type of LED strip. Consider the following factors:

-
Type of LED Strip:
- RGB Strips: These strips allow you to change colors and create dynamic lighting effects. They are ideal for entertainment rooms, gaming setups, and party spaces.
-
COB LED Strips: COB (Chip-On-Board) LED strips provide a continuous, smooth glow and are perfect for ambient lighting in living rooms, kitchens, and bedrooms.
|
Type of LED strips |
 |
 |
 |
|
Product Title |
|||
|
Model |
AC1L |
AC1T |
SH3L |
|
LED Density |
96LEDs/m |
96LEDs/m |
96LEDs/m |
|
Voltage |
12V |
12V |
24V |
|
Width |
8mm |
10mm |
8mm |
|
Length |
16.4Ft |
16.4Ft |
16.4Ft |
|
Light Color |
RGB |
RGB |
COB |
|
Power Supply |
DC |
DC |
DC |
|
Control Method |
Remote |
Remote |
Remote |
|
Feature |
Spotless |
Waterproof, Spotless |
Spotless |
- Voltage: LED strips typically come in 12V or 24V options. Ensure the voltage of your strips matches the power supply you plan to use.
- Color Temperature: Choose between warm white (2700K-3000K), cool white (5000K-6500K), or tunable white (adjustable between warm and cool) based on the mood you want to create.
LED Lights Installation Step 2: Prepare Your Tools and Materials
Once you have chosen the right LED strips, gather the necessary tools and materials:

- LED Strip Lights: Ensure you have the correct length and type of LED strips.
- Power Supply: Choose a power supply that matches the voltage and wattage requirements of your LED strips.
- Quick Connectors (Optional): These can simplify the connection process.
- Clean, Dry Surface: Ensure the installation area is free from dirt and dust.
- Scissors: Use these to cut the LED strips at the designated cut lines.
- Adhesive Reinforcements: Double-sided mounting tape or 3M VHB tape can provide extra security.
LED Lights Installation Step 3: Cut LED Strip Lights to Length

With your tools and materials ready, it’s time to cut the LED strip to the desired length. LED strips can be trimmed to fit your space, but only at the marked cut lines. These lines are typically indicated by scissors icons. Cutting elsewhere may damage the strip and cause segments to malfunction.
Tip: If your strip doesn’t have visible cut lines, check the manual or contact the manufacturer for guidance. For strips without cut lines, you can usually cut between the LED chips, but exercise caution to avoid damaging the circuit.
LED Lights Installation Step 4: Connect the LED Strip to Power
Now that your LED strip is cut to the right length, it’s time to connect it to the power supply. This step ensures your strips light up correctly:

- Direct Connection: Use quick connectors to attach the strip’s copper pads to the power supply wires. Ensure the polarity is correct (positive to positive, negative to negative).
- Soldering (Optional): For a more secure connection, solder wires directly to the strip’s pads. Apply solder flux and heat until the solder joints appear shiny and silver.

When connecting multiple strips, make sure they share the same voltage and specs. Use a splitter or amplifier if necessary to distribute power evenly
Important Notes for Installation
Do Not Power While Rolled: Running LED strips while still coiled can cause overheating and reduce lifespan.Cut Only at Marked Points: This ensures the circuit remains intact.Avoid Exceeding Maximum Length: For instance, 12V LED strips typically support up to 16 feet in a single run; exceeding this length can lead to a voltage drop.
|
Voltage |
Maximum Run Length |
Recommended Power Supply |
|
12V |
16 feet |
30W–60W for typical 5-meter strips |
|
24V |
32 feet |
60W–120W for high-density applications |
LED Lights Installation Step 5: Test the Lights

Before securing the strips, connect them to the power supply and turn them on. Check for consistent brightness and color across the length. This is also the time to address any connectivity issues. If the lights don’t work, double-check your connections and ensure the power supply is functioning properly.
LED Lights Installation Step 6: Clean and Prep the Installation Surface
Dirt and dust can interfere with the adhesive backing, so it’s crucial to clean the surface thoroughly before installation. Use a damp cloth to wipe down the area and ensure it is completely dry before applying the LED strips.
LED Lights Installation Step 7: Stick the LED Strips to the Surface
With the surface clean and dry, peel off the adhesive backing and press the strip firmly onto the surface. For uneven or porous areas, use additional double-sided tape or mounting clips to reinforce the hold. Press firmly along the entire length of the strip to ensure good adhesion.

Troubleshooting Tip: If your LED strips keep falling off, check if the adhesive is compatible with the surface material. For tricky spots, opt for 3M VHB tape or silicone adhesive, which provide a stronger bond.
LED Lights Installation Step 8: Secure the Power Supply
If your power supply is not already mounted, find a suitable location to secure it. Ensure it is out of reach and in a well-ventilated area to prevent overheating. You can use screws or adhesive to mount the power supply to the wall. For a neater appearance, consider using cable ties to manage the wires.
LED Lights Installation Step 9: Final Inspection and Cleanup
Once everything is installed and working, give your setup a final inspection. Make sure all connections are secure and there are no loose parts. Clean up any tools and materials, and enjoy your newly illuminated space.
How to Install LED Strip Lights: Power Supply and Drivers
Choosing the right power supply is crucial for ensuring your LED strips function correctly and safely. Follow these steps to determine the appropriate power supply:

-
Calculate the Strip’s Total Wattage:
-
Formula: Length (feet) × Wattage per foot
-
Example: A 16-foot LED strip rated at 4.5W per foot needs:
-
16 feet×4.5 W/foot=72 W16 feet×4.5 W/foot=72 W
-
Add a 20% Safety Margin:
-
Formula: Total wattage × 1.2
-
Example:
-
72 W×1.2=86.4 W72 W×1.2=86.4 W
-
Ensure the Voltage Matches the Strip’s Specifications:
- Example: Choose a power supply rated for at least 90W at the correct voltage (12V or 24V).
Do I Need a Driver for Each LED Light?
Not necessarily. A single driver can power multiple strips as long as it matches their combined wattage and voltage requirements. However, if you are installing multiple strips in different locations, you may need separate drivers to ensure each strip receives the correct amount of power
How to Install LED Strip Lights: Cutting and Reconnecting LED Strips
Cutting LED strips is straightforward, but reconnecting requires precision. For strips with cut lines, use quick connectors or soldering to join sections. For strips without cut lines, consult the manufacturer for approved methods. Always ensure the connections are secure to avoid short circuits or malfunctions.
Welding Techniques
If you choose to solder your connections, follow these steps to ensure a secure and reliable connection:

- Turn Off the Power: Before you start, make sure the power is turned off to avoid electrical shock.
- Cut the Light Strip: Use scissors to cut the LED strip at the designated cut lines.
-
Set the Soldering Iron Temperature: Set your soldering iron to the appropriate temperature (usually around 350°C or 662°F).
- Apply Solder Flux: Apply solder flux to the copper pads on the LED strip to improve the soldering process.
- Melt the Solder: Use the soldering iron to melt the solder wire and connect the copper pads to the wires.
- Test the Connection: After soldering, test the connection to ensure it is secure and the LED strip lights up correctly.
Non-Welding Connection Options
If you prefer not to solder, there are alternative methods to connect your LED strips:
- Quick Connectors: These are pre-made connectors that can be easily attached to the copper pads on the LED strip.
- Extension Cables: Extension cables are used to connect LED strips of longer lengths without soldering.
- Power Amplifiers: For longer runs, use a power amplifier to boost the signal and prevent dimming.
How to Install LED Strip Lights: Connecting Multiple LED Strips
When connecting multiple LED strips, follow these steps to ensure a seamless setup:
Series Connection
Connecting LED strips in series is ideal for shorter runs. In a series connection, the power flows through each strip sequentially. However, be aware of voltage drop, which can cause the last strip in the series to be dimmer.
Parallel Connection
Connecting LED strips in parallel prevents dimming over long distances. In a parallel connection, each strip receives the same amount of power independently. This method is more reliable for longer runs but may require a power amplifier or splitter to distribute power evenly.
- Connect the First Strip: Attach the first segment of the LED strip to the power supply using quick connectors or soldering.
- Connect Subsequent Strips: Connect the next segment to the first using quick connectors or soldering, ensuring the signal flow direction is consistent.
- Test the Setup: Once all strips are connected, turn on the power supply and test the setup to ensure all segments are working correctly.
Handling Longer Runs
For LED strips longer than 5 meters, you may experience dimming at the end of the strip due to voltage drop. To solve this issue, consider the following solutions:
- Increase Voltage: Use a higher voltage power supply to reduce the voltage drop.
- Use a Power Booster: Install a power booster or amplifier to maintain consistent brightness throughout the strip.
- Multiple Power Supplies: Multiple power supplies are used to power different sections of the strip.
How to Install LED Strip Lights: Safety and NEC Compliance
Always adhere to the National Electric Code (NEC) for safe and code-compliant installations. Key points to remember:
- Avoid Overheating: Never power up the strips while they are coiled, as this can cause overheating and pose a fire hazard.
- Proper Ventilation: Ensure the power supply is placed in a well-ventilated area to prevent overheating.
- Grounding: If your installation involves metal components, ensure they are properly grounded to avoid electrical shock.
For more detailed information, refer to the National Electric Code (NEC)provided by the National Fire Protection Association (NFPA).
Brighten Your Space with Ease

Installing LED strip lights doesn’t have to be a daunting task. With the right tools, preparation, and a little patience, you can transform any space into a modern, glowing haven. From RGB setups in your gaming room to COB LEDs illuminating your kitchen, the possibilities are endless.
So, what are you waiting for? Dive into your DIY project, and let your creativity shine—literally! If you have questions or need help selecting the perfect lights, visit Muzata for expert advice and top-quality products.
We hope this guide has provided you with all the information you need to successfully install LED strip lights in your home. Remember, the key to a great installation is attention to detail and following the steps carefully. Happy lighting!
FAQs
Q1: How Do I Stick LED Strips to the Wall?
A1: Use the adhesive backing or apply mounting clips for extra security. Clean the wall thoroughly before installation to ensure proper adhesion. For surfaces that are difficult to stick to, consider using 3M VHB tape or silicone adhesive.
Q2: What’s the Best Adhesive for LED Strip Lights?
A2: 3M VHB tape or silicone adhesive works best for stubborn surfaces. These adhesives provide a strong bond and are resistant to temperature changes and UV exposure.
Q3: How Do I Prevent LED Strips from Falling Off?
A3: Ensure the surface is clean and dry before installation. For added hold, consider using mounting channels or brackets. Regularly inspect the strips and reapply adhesive if necessary to maintain a secure hold.
Q4: Do I Need a Driver for Each LED Light?
A4: Not necessarily. A single driver can power multiple strips as long as it matches their combined wattage and voltage requirements. However, if you are installing multiple strips in different locations, you may need separate drivers to ensure each strip receives the correct amount of power.
Q5: How to Connect Multiple LED Lights to One Power Supply?
A5: To connect multiple LED lights to one power supply, use a parallel connection. This method ensures each strip receives the same amount of power independently. You may need a power amplifier or splitter to distribute power evenly.
Q6: How to Find the Correct LED Driver?
A6: To find the correct LED driver, follow these steps:
- Determine the Total Wattage: Calculate the total wattage of all the LED strips you plan to connect.
- Check Voltage Compatibility: Ensure the driver’s output voltage matches the voltage of your LED strips.
- Consider Safety Margins: Add a 20% safety margin to the total wattage to ensure the driver can handle the load.
Q7: Where Do You Cut LED Strips with No Cut Line?
A7: If your LED strips do not have visible cut lines, you can usually cut between the LED chips. However, it’s essential to exercise caution to avoid damaging the circuit. Consult the manufacturer’s manual or contact customer support for specific instructions.
Q8: How to Cut LED Light Strips and Reconnect them?
A8: Cutting LED strips is straightforward, but reconnecting requires precision. For strips with cut lines, use quick connectors or soldering to join sections. For strips without cut lines, consult the manufacturer for approved methods. Always ensure the connections are secure to avoid short circuits or malfunctions.
ABOUT THE AUTHOR